How to make concrete paving slabs
HOW TO MAKE CONCRETE PAVING SLABS

1. Prepare the Work Area
Clear and clean the area where you are going to pour the concrete slabs. Place the mould on a steel plate and ensure it is level and clean. Make sure the mould has been thoroughly cleaned before use and concrete residue from previous castings has been removed.

2. Install Cast-in Profile (Optional)
By inserting a cast-in profile into the concrete slab mould, you can create slots for lifting chain hooks. Use of a lifting chain with slab hooks allows you to easily transport the concrete slab. Place the profile in the mould and secure it by putting the pins in the designated holes in the mould.

3. Prepare the Mould
Apply a suitable release agent or mould release oil to the insides of the mould to prevent the concrete from sticking. This will make it easier to remove the slab once it’s finished. If you’re using steel reinforcement ‘rebar’ mesh for added strength, place it into the mould with appropriate rebar spacers before pouring the concrete. If you’re using the cast-in profiles to create lifting slots, seal the opening of the small rectangular hollow sections with tape to prevent concrete from getting into them.

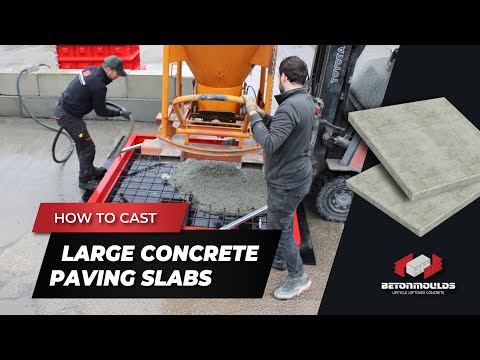
4. Pour the Concrete
Fill the mould completely with the concrete mixture, and make sure it is evenly distributed. Use a concrete vibrator to help settle the concrete and create a solid slab without air pockets.

5. Level and Cure the Concrete
Use a concrete straightening tool to level the concrete surface in the mould. Make sure it’s smooth and even. Cover the mould with sheeting or apply a curing compound to slow down the evaporation of moisture from the concrete. Allow the slabs to cure for at least 24-48 hours. The final curing time depends on temperature, humidity, air content, the use of mineral admixtures and the type of cement used. Properly curing concrete improves strength, wear resistance, durability, and water tightness.

6. Demould the Slabs
Once the concrete has fully cured, carefully remove the slab from the mould. Start by loosening the edges with a mould opener and then gently remove the mould from the slab. Following these steps should result in well-made concrete paving slabs ready for use in your desired project.

7. Turn the Slabs Over (Optional)
Concrete slabs are often turned over after curing because the underside has the smoothest surface and optimal aesthetic appearance. Our slab-lift-turn is ideally suited for turning and moving large concrete slabs 200cm wide.

8. Install the Concrete Slabs
You can now install the slabs in your desired location. Ensure the surface is prepared and level before placing the slabs. We also provide lifting equipment: a concrete slab hoisting chain with hooks that fit the slots made by cast-in profile. This lifting chain can also be attached to the Slab-Lift-Turn, making lifting and transporting of concrete slabs an easy task. If you did not use cast-in profiles, the concrete slabs van be installed with a vacuum slab lifter.